Monday 19 August 2013

Angel Food Cake for 1st Blogiversary!


Angel Food Cake
(adapted from Taste)

6 egg whites
3/4 teaspoon cream of tartar
1/4 teaspoon salt
3/4 teaspoon vanilla essence (I use imitation vanilla)
220g (1 cup) caster sugar
100g (2/3 cup) plain flour, sifted

1. Bake oven to 180°C/160°C fan-forced. Line base of 20cm cake pan with baking paper. (Note: the cake pan should be no non-stick material)

2. In a large bowl, beat egg whites until foamy and then add in salt, cream of tartar and vanilla and beat on medium speed until soft peaks form, about 3 minutes. Gradually add in the sugar at about 2 tablespoons at a time. Raise speed to high and beat until peaks are stiff and glossy (but not dry), for approx. 2 minutes.


3. Sift the flour over the egg white mixture in 3-4 parts and gently fold in each addition with a spatula.

4. Gently pour batter into the cake pan. Run a knife through the batter to release any air bubbles, and smooth the top with spoon or offset spatula. Bake the cake for approx 30 minutes, until the cake is golden brown and springs back gently when touched.

5. Invert the pan on a wire rack and let the cake cool for about 1 hr. Carefully run a knife around the side of the cake to loosen, then unmould onto the wire rack. Serve with whipped cream and strawberries if desired.


Tuesday 2 July 2013

Sticky Date Cheesecake with Caramel Fudge Sauce

If you love cheesecake and sticky date pudding, this is a cake that you must try!

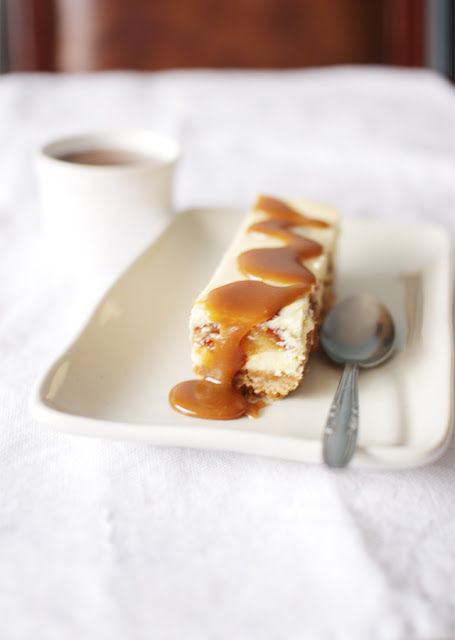
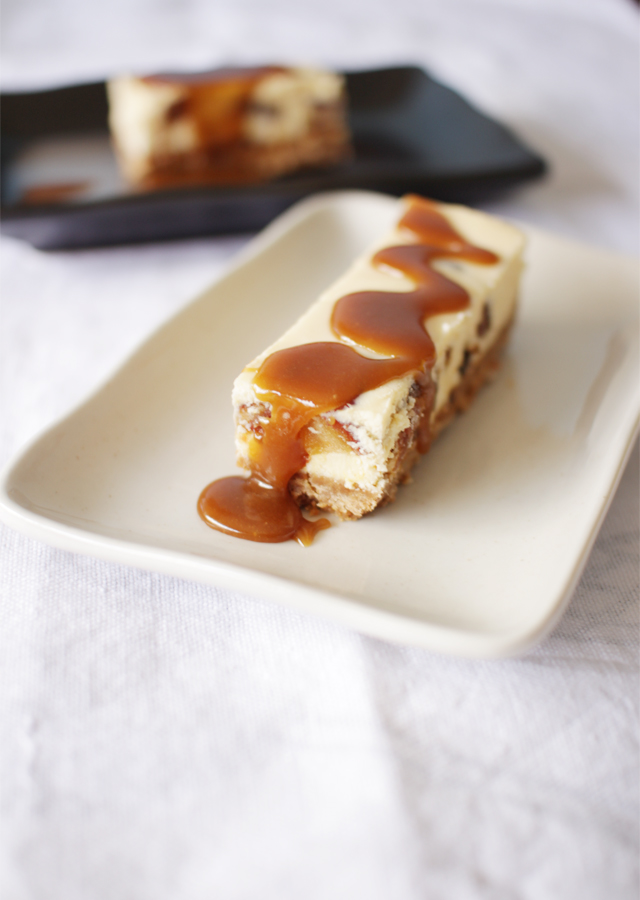
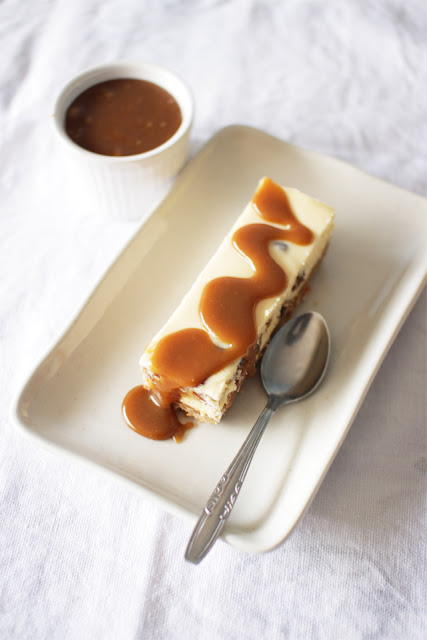
This recipe caught me by the eye the first time when I curiously laid my eyes at the packaging of a cream cheese at my local supermarket. Within my heart, I knew from then on that I would definitely bake it one day. This sticky date cheesecake is super delicious. If you have a sweet tooth, this is definitely the cake for you. However, I tend to see a bipolar response from friends and family with regards to the caramel fudge sauce. Ones who love it can literally drink the sauce by itself ( I do mean it literally!) and ones who don't like their desserts being too sweet will draw back and ascend the white flag. I personally like to have a slice with some drizzles of caramel fudge sauce on top, as illustrated in the photos. If your family is not a big caramel fan to begin with (like mine) then I recommend you to halve the amount as suggested. I made three-quarters of the amount and it was still too much that it had to go to waste in the end. On the contrary, I had wished that if only this recipe was able to give me a bigger cake instead of a loaf-sized one instead. But nonetheless, I know this would not be the last time that I'll be baking it.

Sticky Date Cheesecake

(adapted from Kraft Philadelphia Cream Cheese)

100g butternut snap biscuits, crushed (I used 150g arrowroot biscuits instead...I like my crust thick)
20g unsalted butter melted (I used 50g instead)
375g Original Philadelphia Cream Cheese, softened
1/3 cup caster sugar
1 teaspoon vanilla
1 large egg
2 teaspoons plain flour
5 (125g) fresh dates, chopped

1. Preheat the oven to 160°C/140°C fan-forced. Grease a 9cm x 20cm loaf tin and line with baking paper.

2. Make the crust first by combining crushed biscuits and melted butter in a bowl. Press into the base of lined cake tin. Chill in refrigerator until the cheesecake mixture is ready.

3. Beat the cream cheese, sugar and vanilla with an electric mixer until smooth. Beat in the egg until well incorporated, then stir in the flour and dates with a spatula.

4. Pour the cheesecake mixture on top of the crust and bake for 25 minutes or until just set. Cool in the oven with the door ajar for at least 30 minutes and then transfer into the refrigerator to chill for at least 4 hours or overnight.

Caramel Fudge Sauce
(Make this on the day when serving)

1 cup of brown sugar, firmly packed
80g butter, chopped
1/3 cup cream
Optional: Cream, extra to serve.

In a small saucepan, combine the brown sugar, butter and cream and stir over low heat for 5 minutes until mixture has thickened. Serve immediately with a slice of cheesecake.


Disclaimer: This blog post is based on my personal and honest opinion about this recipe published with permission but has no relation to Mondelez Australia.

Sunday 2 June 2013

Coconut Cake with Lemon Cream Cheese Frosting

I like my coconut in chocolate and cakes. Moist, fluffy, soft, tangy and not overbearingly sweet are the words to describe this cake. It's simply delicious. I knew something was missing after I finished frosting the cake as it looked a bit too plain. Luckily I had some flaked almonds and coconut shreds to give me a beautiful mess on top of the cake.

Coconut Cake with Lemon Cream Cheese Frosting

(adapted from Raspberri Cupcakes)

250g butter, softened
1 1/2 cups caster sugar
1 teaspoon coconut essence (I didn't use this)
4 eggs
1 cup (80g) dessicated coconut
3 cups self raising flour
250g sour cream
1 cup milk

1. Preheat oven to 180°C/160°C fan-forced. Grease and flour two 18cm round cake tins.

2. Beat butter and sugar until light and fluffy. Add in coconut essence and beat until incorporated then add in eggs one at a time.

3. Add half of the dry ingredients (flour and coconut) followed by wet ingredients (sour cream and milk) and mix until just combined. Add the remaining dry and wet ingredients. Make sure to not overmix.

4. Separate the batter evenly into the two greased tins and bake for 45-50 minutes or until skewer comes out clean. Cool the cake in the tin for 10 minutes, then turn out onto a cooling rack to cool completely.

Lemon Cream Cheese Frosting

250g cream cheese
25g butter, softened
1 cup icing sugar
1/2 teaspoon lemon zest
1/2 cup thickened cream

Beat the cream cheese and butter until smooth. Add the lemon zest then gradually add in the icing sugar and beat until incorporated. Using clean beaters, beat the cream until stiff peaks form then add to the cream cheese mixture and mix until smooth. Sandwich icing between the two cake layers and crumb coat the cake with icing. Use the remaining icing to cover the cake completely.