Friday 29 March 2013

Happy Easter everyone!


Today, we celebrated the fruits of my dad's labour in the backyard with a large bitter gourd. Bitter gourd is the least of my favourite vegetables although it's meant to be good for you but as it's name suggests...it's BITTER! But for some reason we were all excited and enthusiastic with our cameras to snap away at our very first harvest of 2013. It also turned out that the bitterness was acceptable to my tastebuds this time. But I guess that's all due to my dad's wonderful cooking of the bitter gourd. It's definitely a Good Friday for our family today.
Last week, I actually baked this flourless orange cake but still wanted to share it with you all. I was scavenging for the ingredients that I already have in the kitchen to come up with something good to eat. I realised I still had oranges left and immediately craved for the flourless orange cake once again. Although this is my second time making it, I ended up boiling an extra orange by not reading the recipe carefully. What do I do with the extra orange? Make orange syrup for the cake. Oh em gee, the cake was divine and delicately moist with that extra ooze of syrup drizzled on top. Such a beautiful mistake :)


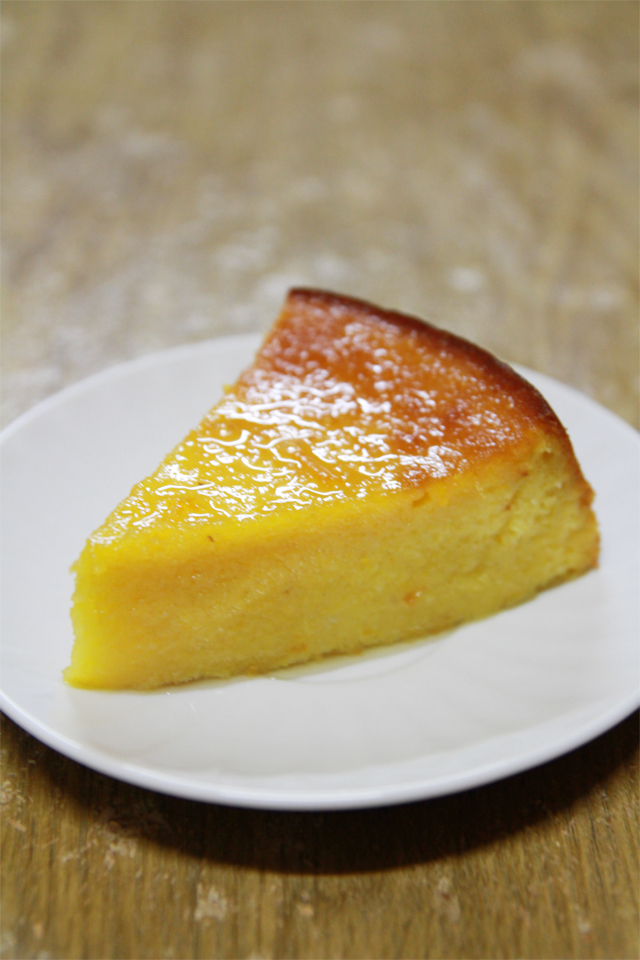
Flourless Orange Cake with Orange Syrup

(cake recipe adapted from Citrus and Candy and you can get the orange syrup recipe from here)

2 medium oranges, seedless
6 eggs
1 cup caster sugar
1 1/2 teaspoons baking powder
1 1/2 cup almond meal

1. Wash and scrub the outside of the oranges and place the whole orange (skin and all) in a pot. Fill with cold water to cover. Place over medium-high heat and bring to boil.

2. Once it's boiled, allow it to simmer for approx. 20mins and replace with cold water and bring it to boil again. Repeat this process once again.

3. On the third round, once the oranges are boiled, let it simmer for about an hour and then drain the oranges. Set them aside to cool.

4. When the oranges have cooled, roughly chop them to pieces and remove any seeds and white pith. Place them in a blender or food processor (skin and all) and blend until you get a fine puree. Measure out 1 1/4 cups of puree and store the rest in a container (if any) for next use.

5. Preheat oven to 175°C/155°C fan-forced. Grease and flour a 23-25cm cake tin. Alternatively, you may line the base with baking paper.

6. Using an electric mixer, beat the eggs, sugar and baking powder until thickened and pale in colour. Add in almond meal and mix well.

7. On low speed, gradually add in the orange puree in 2-3 batches. Beat for at least 20sec after each addition.

8. Pour the batter into the cake tin and bake for 50min ~ 1hr or until when the skewer comes out clean from the cake.

9. Allow the cake to cool for 10min before transferring it to a cooling rack.
Time to dig into the deliciously moist cake!

Friday 22 March 2013

Classic Baked Cheesecake with Blueberry Sauce

Hold back your salivas ladies and gentlemen! Here comes a drool-worthy cheesecake drizzled over with some amazing blueberry sauce. I actually cannot believe that I haven't made a post on this yet.

This is the cake that changed my life.
The one that made me believe that I can actually bake as I previously had little faith in myself.
The one that made me fall in love with baking.
The one that is so simple to bake.
The one that is revered deeply in my heart.
And the one that has become my 'signature' cake that friends and family remember me for.
 
Recently, our household accommodated a lovely couple from overseas. The uncle and aunty were such a cute pair together. Since it was auntie's first time in Australia, I thought why not welcome her with my 'signature' cheesecake...and oh gosh, she loved it. Love to the point that she proactively seeked for the recipe and got me to explain in detail of how to bake it. For the first time, I had to translate a recipe in chinese for someone... and that part was a little bit daunting for me since my vocabulary is quite limited.
The blueberry sauce definitely deserves a mention as well. It's so good that it's not just an accessory to the cheesecake but a wedded partner. It's got the naturally berry sweetness with a bit of tangy flavour from the lemons. Beautiful combination. Now I'm craving pancakes just as an excuse to have more of that blueberry sauce.

Classic Baked Cheesecake with Blueberry Sauce

(cheesecake recipe adapted from Arnotts)

Biscuit base
250g plain biscuits, finely crushed (Marie, Nice, Arrowroot etc)
125g unsalted butter, melted
1 tsp ground cinnamon (optional)

Cheesecake
500g cream cheese, softened
1/2 cup sugar
1 tsp vanilla essence (I used Vanillin)
3 eggs

1. Preheat the oven to 150°C/130°C fan-forced. Lightly grease a 20cm springform tin or line the cake tin with baking paper (if you don't have a springform tin).

2. In a bowl, combine crushed biscuits, cinnamon and melted butter. Press firmly onto base and 3/4 of the way up the sides of the cake tin. Refridgerate for 30mins or until the cheesecake batter is ready.

3. Using an electric mixer, beat cream cheese, sugar and vanilla until smooth.

4. Add eggs one at a time, beating well after each addition until combined. Pour into biscuit base. Bake for 50 minutes.

5. Once baked, turn off the oven. Leave cheesecake in the oven with the door ajar for 1 hour.

6. Chill in the refrigerator for 4 hours or overnight.

Homemade Blueberry Sauce

(recipe adapted from My Baking Addiction)

2 cups (250g) fresh or frozen blueberries
1/2 cup water
1/2 cup sugar
2 tbsp lemon juice
2 tbsp cornstarch, mixed with 2 tbsp cold water
1/2 tsp vanilla extract (I used Vanillin)
Zest of 1 lemon (approx. 1 tbsp)

1. In a small saucepan over medium heat, combine blueberries, 1/2 cup water, sugar and lemon juice. Stir frequently and bring to low boil.

2. In a small bowl, mix cornstarch with cold water. Slowly stir the cornstarch into the blueberries, taking care not to crush the blueberries. Stir until the sauce is thick enough to coat the back of a metal spoon, about 5 minutes.

3. Remove from heat and gently stir in the vanilla and zest. If the sauce is too thick for you, slowly add in water until you've reached desired consistency.